Strony

poniedziałek, 20 sierpnia 2012

RTCU datalogger cont.

Okay, so as I wrote in the last post I had to modify the code in order to get any possibility apart from datalogging. I used asynchronous function blocks in order to get the 1-Wire communication in a separate thread-like entity.

 FUNCTION_BLOCK ASYNC Temp_DS1820;  
 VAR_INPUT  
   family : int;  
   kill : bool;  
 END_VAR;  
 VAR_OUTPUT  
   temp_calk, temp_ulam : int;  
 END_VAR;  

After that you have only to define a variable of type Temp_DS1820 and voila. To write the temperature into a file I use fsFileWriteStringNL and get the output variables out of the variable connected with the function block

 fsFileWriteStringNL(fd:=file_id, str:=temp="+intToStr(v:=temperature.temp_calk)+","+intToStr(v:=temperature.temp_ulam));  

Making the function block asynchronous makes it a separate thread without using a real thread. You only have to remember to put everything in the function block into a loop (I used while not kill do <...> end_while, so I can 'kill' this 'thread' whenever I want to) to work constantly.

This way I achieved ~15 times faster execution of the main program loop (that was only writing the temp into the file every 60 s) in the main program. This means that one can do tons of other things instead of waiting for ~700 ms to convert the temperature. Such approach can, of course, be used for various other applications that require the program to wait. RTCU DX4 is capable of multithreading so let's use it.

RTCU data logger

In this example I used a DS1820 1-Wire temperature sensor. The temperature is read from the sensor and written in a ASCII file on the SD-Card in the RTCU. Here's the code

 PROGRAM a1wire;  
 // These are the local variables of the program block  
 VAR  
   ow_dev : int;  
   sign : sint;  
   family : int;  
   dane_sint1, dane_sint2 : sint;  
   dane_int1, dane_int2 : int;  
   temp_calk, temp_ulam : int;  
   file_id : file;  
 END_VAR;  
   ow_dev:=owSearchX(first:=0, last:=255, reset:=true); // Scan the 1-Wire network  
   DebugMsg(message:=intToStr(v:=ow_dev)); // Number of 1-Wire devices in our case it is 1  
   family:=owGetFamily(device:=1); // Get the family name of the device  
   DebugMsg(message:=intToStr(v:=family)); // Family name of the device  
   DebugMsg(message:=owGetID(family:=family, device:=1)); // Get the 64bit ID of the device  
   if fsMediaPresent(media:=0) and (fsMediaOpen(media:=0)=0) then fsMediaQuickFormat(media:=0); fsDirCreate(name:="test"); fsDirChange(path:="A:\test"); fsFileClose(fd:=fsFileCreate(name:="test.txt")); fsMediaClose(media:=0); DebugMsg(message:="file created"); end_if; // if media is present and opened create a directory and go inside  
   fsMediaOpen(media:=0); // Open SD-Card  
   displayClear();  
 BEGIN  
   // Code from this point until END will be executed repeatedly  
   owAccess(family:=family, device:=1); // Acces the DS1820  
   owWrite(data:=16#44); // Order the DS1820 to convert temperature  
   Sleep(delay:=700); // Wait for 700 ms (DS1820 datasheet says tha this should be at least 750ms, but 700ms work for this particular DS1820)  
   owRelease(); // Release the 1-Wire network  
   owAccess(family:=family, device:=1); // Acces it again  
   owWrite(data:=16#BE); // Order the DS1820 to send the scratchpad content  
   owRead(data:=dane_sint1); // Read LSB   
   owRead(data:=dane_sint2); // Read MSB  
   if dane_sint1<0 then // Convert the temperature  
    sign:=64;   
    else   
      sign:=0;   
    end_if;  
   temp_calk:= shr8(in:=shl8(in:=dane_sint1, n:=1), n:=2)+sign;  
   if dane_sint2 <> 0 then // Get the sign of the temperature  
    temp_calk:=temp_calk*-1;   
    end_if;  
   temp_ulam:= 5*(dane_sint1 mod 2); // Calculate the fractional part of the temperature  
   owRelease(); // Release the 1-Wire network  
   if fsMediaOpen(media:=0)=0 then // Open the SD-Card  
    file_id := fsFileOpen(name:="a:\test\test.txt"); // Open file  
    if fsFileStatus(fd:=file_id) = 0 then // If file is opened...  
      DebugMsg(message:="file write status "+ intToStr(v:=fsFileWriteStringNL(fd:=file_id, str:="temp="+intToStr(v:=temp_calk)+","+intToStr(v:=temp_ulam)))); // ...write a string in it  
      fsFileClose(fd:=file_id); // Close the file  
      end_if;  
    end_if;  
   displayString(message:="temp="+intToStr(v:=temp_calk)+","+intToStr(v:=temp_ulam)); // Display the temperature  
 END;  
 END_PROGRAM;  

And it works! producing a test.txt file with

temp=28,0
temp=28,5
temp=28,5
etc...

Okay, that's great, but hey - I used the whole controller capacity for that. Every single run of the software takes ~1s (mainly due to the fact that I'm waiting for the temperature conversion for 700ms). So the next thing to do is to put the temperature reading from the 1-Wire sensor into a asynchronous functionblock or another thread, as this controller is able to multithread. Stay tuned for that, as I guess it will take me a bit to do ;-).

And I would like to thank Stanko, for help with calculating the temperature from the 1-Wire data :-).

piątek, 17 sierpnia 2012

RTCU front-panel keypad

In this example I use the front keypad to control an integer variable. Using up and down keys (codes 120 and 121) the user can increment and decrement the variable. Pressing ESC key (code 125) resets the variable to 0.


 PROGRAM keypad;  
 // These are the local variables of the program block  
 VAR  
 k : INT; //Key pressed on the front-panel keypad  
 x : INT; //Some number  
 END_VAR;  
 // The next code will only be executed once after the program starts  
   x := 0;  
   displayClear();  
 BEGIN  
 // Code from this point until END will be executed repeatedly  
   k := displayGetKey(timeout:=1);  
   if k = 120 then   
    x := x+1;   
    elsif k = 121 then   
      x := x-1;   
      elsif k = 125 then   
       x := 0;   
   end_if;  
   displayXY(x:=1, y:=1);  
   displayNumber(number := x);  
 END;  
 END_PROGRAM;  

The variable is displayed on the front-panel LCD using displayNumber() function, that is much easier to use when displaying only numbers, compared to displayString(message:=intToStr()) function combination. On the other hand when using the displayNumber one can not easily format the output with some markings, so I suggest sticking to the casting method (eg. casting the integer to string and adding some text markings). The output is similar, the displayNumber() example code takes 2658 bytes and  displayString(message:=intToStr()) takes 2712 bytes. Additional 54 bytes are occupied by the casting I guess, but this shouldn't be a big problem, when one realizes that the total memory for the configuration is up to 640 KB.

The next big thing - filesystem on the internal memory and on SD-card.

RTCU cont.

So I have started playing with the RTCU DX4 pro that I've mentioned earlier. The approach is quite new for me, as I'm used to drawing your software, instead of writing the code, as I'm usually programing in LabView. Also most of the automation engeineers is used to graphic programming, as most of the PLC software is 'drawn'. But... here we go.

Firstly - I have got an LCD in the unit. Screw blinking LEDs, lets do the classics:


 PROGRAM test_1;  
 // These are the local variables of the program block  
 VAR  
 END_VAR;  
 // The next code will only be executed once after the program starts  
 // displayClear();  
   displayPower(power:= ON);  
   displayXY(x:=1, y:=1);  
   displayString(message:="Hello world");  
   Sleep(delay:=3000);  
   displayClear();  
   an_out := 100;  

So - yay - the display works. Next thing is to display something more 'active', lets do a clock:


Okay. And next - add some status readings. In this cas the power supply voltage and temperature inside the module (and a mysterious number):


 BEGIN  
   // Code from this point until END will be executed repeatedly  
   clock();  
   displayXY(x:=1, y:=1);  
   displayString(message:="T "+sintToStr(v:=clock.hour)+":"+sintToStr(v:=clock.minute)+":"+sintToStr(v:=clock.second)+" ");  
   displayXY(x:=1, y:=2);  
   displayString(message:="V="+intToStr(v:=boardSupplyVoltage()/10)+" temp="+intToStr(v:=boardTemperature()/100));   
 END;  
 END_PROGRAM;  

The mysterious number is read from the front-panel keypad that I'm currently fighting with. Wihout using any kind of interrupts it's quite hard to have an keyboard input AND do some stuff in the same time. I mean - you can always multithread (this controller is capale of that) but wihout that it is not that simple, and there must be a trick to do that. Currently I do not know the trick so I'm stuck with that.

The clock() is a functionblock of clockGet type, that allows me to get to the real time clock in the device.

Tomorrow I'll try to interface with the SD-card inside and iButton memory on the dedicated 1-Wire line. If someone would need the codes for the upper examples I can publish them here. Source code posted for the upper examples and will be posted for all examples later.

czwartek, 16 sierpnia 2012

New toy

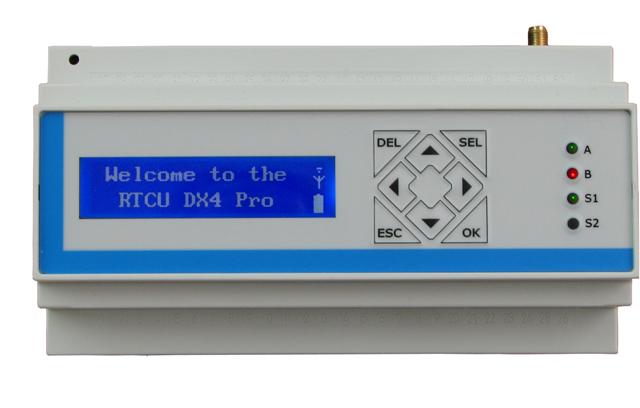
I've obtained an Remote Telemetry and Control Unit from Logic IO and I'll be playing with it in next few days/weeks. The RTCU DX4 pro is an GPRS-enabled control model for remote telemetry. The module is equipped with many cool functionalities (like iButton support) and several analog and digital IOs. It is programmed in some pseudo-pascal language and configured via USB. So stay tuned and wait for first effects.